
3D Action Figure Generator
Transform any photo into a stunning 3D action figure collectible
Create personalized 3D action figure designs from your photos. Perfect for custom toys, collectibles, game characters, and figurine concepts. Our AI transforms ordinary images into detailed action figure renders.
Click to upload or drag and drop
PNG, JPG, WEBP up to 10MB
Only 1:1 is free. All other aspect ratios require membership.
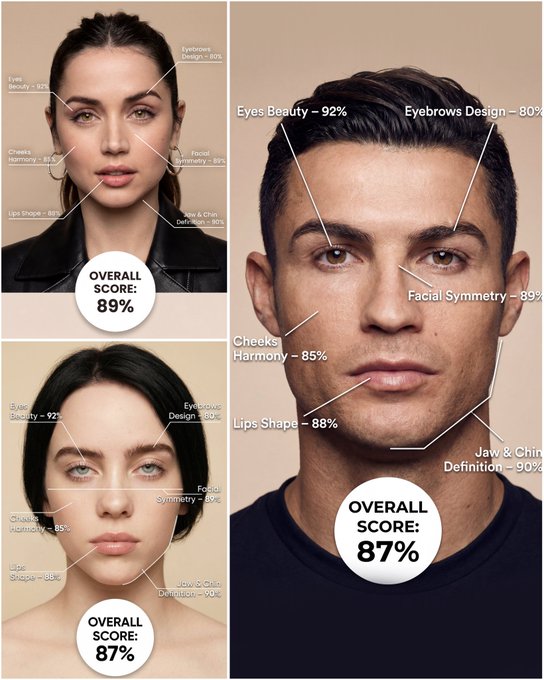
Use the provided portrait photo <YOUR PHOTO> as the base. Do NOT change the person’s face, expression, age, skin tone or gender. Just overlay a clean, minimal infographic on top. Create a high-resolution vertical “FACIAL AESTHETIC REPORT” poster, studio lighting, soft beige background, premium beauty clinic style. The subject can be MALE or FEMALE – keep them exactly as in the original photo. Add thin white lines and labels pointing to each area of the REAL face, with percentage scores based on global aesthetic ratios, symmetry and proportions (not changing the face): 1. Eyes: Label near the eyes with a line pointing to them: “Eyes Beauty – 0–100%” Example: “Eyes Beauty – 92%” 2. Cheeks: Label near the cheekbones: “Cheeks Harmony – 0–100%” Example: “Cheeks Harmony – 85%” 3. Lips: Label close to the mouth: “Lips Shape – 0–100%” Example: “Lips Shape – 88%” 4. Eyebrows: Label above or beside the brows: “Eyebrows Design – 0–100%” Example: “Eyebrows Design – 80%” 5. Jaw & Chin: Label near the jawline and chin: “Jaw & Chin Definition – 0–100%” Example: “Jaw & Chin Definition – 90%” 6. Overall Facial Symmetry: Label near the center of the face: “Facial Symmetry – 0–100%” Example: “Facial Symmetry – 89%” At the bottom center of the poster, add a BIG, bold number inside a circle or rectangle: “OVERALL SCORE: XX%” This is the total facial aesthetic score from 1–100%. Design style: – clean, medical-grade, aesthetic-clinic infographic – modern thin sans-serif typography – white text and lines, subtle drop shadows – no logos, no extra graphics, no text other than the labels and scores above.
Examples


Prompt: create a 1/7 scale commercialized figure of thecharacter in the illustration, in a realistic styie and environment.Place the figure on a computer desk, using a circular transparent acrylic base without any text.On the computer screen, display the ZBrush modeling process of the figure.Next to the computer screen, place a BANDAl-style toy packaging box printedwith the original artwork.


Prompt: Please turn this photo into a character figure. Behind it, place a box with the character's image printed on it .Next to it, add a computer with its screen showing the Blender modeling process. In front of the box, add a round plastic base for the figure and have it stand on it. The PVC material of the base should have a crystal-clear, translucent texture, and set the entire scene indoors.
How To Get Better Results
Best Prompt Tips
- Define the character style, pose, and prop details before adding cinematic effects.
- Use one or two visual references such as toy, chibi, game poster, or mascot instead of many.
- If identity matters, focus on the face, hair, and signature accessories in the prompt.
Best For
- fan-art-inspired transformations and collectible concepts
- avatars, mascots, posters, and stylized identity work
- turning a subject into a more playful or cinematic persona
When To Use Text vs Edit Mode
Use edit mode when identity, product shape, or a source asset needs to survive the transformation. Start from a clean reference image, then let the prompt control styling, environment, and composition.
What Photos Work Best
Upload a sharp, well-lit photo where the face or main subject is clearly visible and not heavily filtered. Avoid crowded backgrounds, extreme blur, and heavy occlusions if you want the result to stay recognizable.
Features
Related Use Cases
3D Caricature
Turn portraits into stylized 3D caricatures with playful, exaggerated personality.

Character Capsules
Create adorable gashapon-style character capsule collectibles.

Chibi Knitted Doll
Transform photos into adorable handcrafted knitted doll versions.

Hyper-realistic Tom & Jerry Fashion Shoot
Create playful high-fashion portraits with hyper-realistic Tom & Jerry 3D styling.